
Warframe: The Tenno’s Journey of the Origin System
So you’ve loaded Warframe for the first time and are now confused as what to do next. You’ve come to the right place as here are some tips, secrets, and tricks to help you on your journey.
The Beginning
Upon creating your account and starting the game for the first time you will do a mission that will introduce you to the basic mechanics.
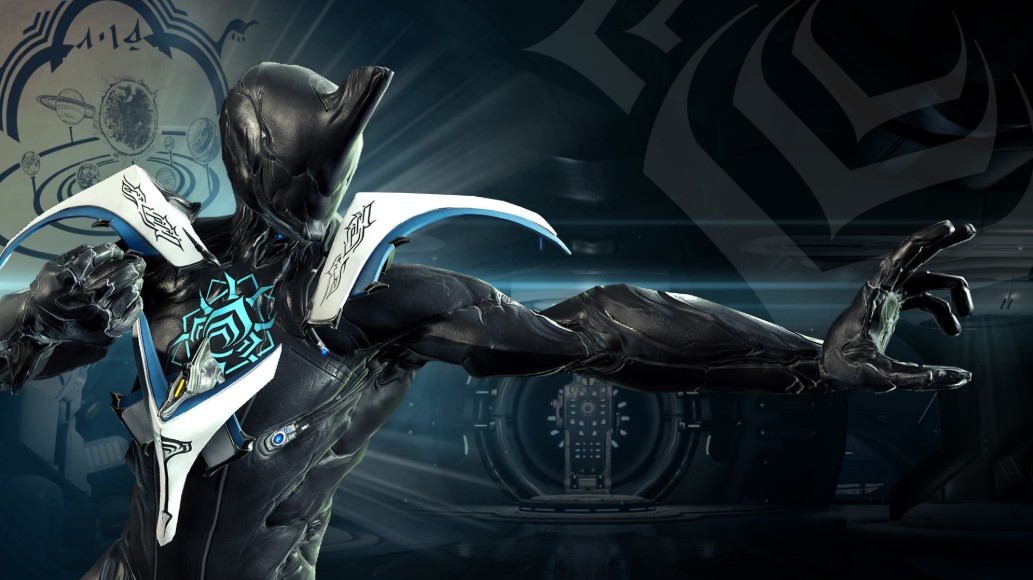
To start off, you will be able to choose between 3 different warframes to start with. They are Excalibur, Volt, and Mag.
- Excalibur is a sword-themed warframe. He is the poster boy of the game itself and will be the one that I recommend the most for new players. The reason why I recommend Excalibur the most is that his abilities are stronger from the get-go as opposed to the other 2 starter frames which require some mods in order to really be impactful.
- Volt is a warframe themed around electricity. He offers abilities that can offer high damage, crowd control, utility, and support. However his abilities will not be as potent early on due to lack of mods. The only good reason to pick Volt over the other 2 starter frames is that he is the hardest to acquire early on. In order to get Volt, you have to be in a clan that has the research for his parts completed.
- Mag is a warframe themed around magnetism. She has abilities that can dish out a ton of damage and crowd control. However, she is also very fragile especially at the beginning of the game. I recommend her the least because she requires mods for her abilities to really be effective. Mods are scarce when the player first starts out. Her parts are also easily obtainable early on as you progress through the star chart.
After choosing your warframe, you will do your first mission which will introduce you to the basic controls of the game. You will be introduced to Captain Vor, one of the antagonists that you will encounter later on in the game. He will put an Ascaris on your warframe which you can remove later on.
- The first types of enemies you will have to fight are Grineer Lancers. You can dispatch them quickly with your first ability (Default Hotkey is 1.)
As you progress through the mission you will have a choice of weapons to choose from. These are preferential as you will be replacing them as you progress through the game.
- For Melee weapons, you have the choice between the Skana or the MK-1 Bo. The Skana is a sword while the MK-1 Bo is a two-handed staff weapon. Both are decent starting options
- For Secondary weapons, you have the choice between the Lato and the MK-1 Kunai. The Lato is a semi-auto pistol while the MK-1 Kunai are silent throwing knives. You can choose either based on your playstyle.
- For Primary weapons, you have the choice between the MK-1 Braton and the MK-1 Paris. The Braton is an automatic assault rifle while the Paris is a silent bow. I would recommend the Braton more unless you want to be stealthy.
Movement
The opening mission will introduce you to some of the movements that you can do, but not all of them.
- You can sprint by holding down the Left Shift button. Additionally, you can just press the left shift button to have your character do a roll.
- You can crouch by holding down the Control button. You can also slide by crouching while moving. You can do a divekick by crouching while moving in the air.
- You can do various types of jumps (Default key is Spacebar.)
- A double-jump can be performed by pressing the jump button twice.
- A bullet jump can be performed by jumping while crouched. This is one of the most important types of movements in-game as it allows you to quickly move through obstacles and dodge enemy attacks. In addition, bullet jumping near enemies will knock them over and deal a small amount of damage to them.
- Another useful movement mechanic is aim gliding. This is executed by pressing the aim button (Default key is Right Click) while in the air. This will allow the player to aim while airborne while also slowing the rate at which they fall.
- You can wall latch by pressing/holding the aim button while mid-air against a wall. This holds you in place next to the wall for a certain amount of time.
- You can wall dash by holding the jump button while near a wall. You can do both vertical and horizontal wall dashes depending on where you are aiming with your crosshair.
Controls
- You can use your warframe abilities with buttons 1-4 by default, laid out respectively from your first ability to fourth ability.
- The Gear wheel may be accessed pressing and holding Q by default. This holds items which may be of use during missions. This will also allow you to access the emotes wheel by pressing Mouse 2 while holding the Gear Wheel button.
- The Use button is bound to X by default. This allows you to open lockers, hack control consoles and interact with various other things in the game.
- You can switch weapons by pressing F, the default hotkey. It will cycle between your Primary and Secondary weapons.
Melee
You will be able to melee attack by pressing E, the default key. In addition, you may perform certain attack combos if you press the melee attack button with other key inputs (such as sliding or holding down the melee button.)
- Slide Attacks can be performed by sliding (crouching while moving) and pressing the melee button during the slide.
- Slam Attacks can be performed by aiming at the ground while in mid-air then pressing the melee button
- Wall Attacks can be performed by wall latching then pressing the melee button. This will launch your character towards the direction you are facing.
The Orbiter
Upon completing the opening mission, you will be introduced to your landing craft. This is basically your new home where you have Ordis who serves as your butler. There are various segments inside the landing craft which you will use regularly as you progress through the game.
The Navigation segment is where you will select what planets and mission nodes to play. This will also display global alerts and events that will happen throughout the solar system.
Next, you have the Communications segment which comprises various things:
- The Codex which stores information about almost everything you will encounter throughout your space adventure. It stores stats and weaknesses of enemies that you encounter, lore, mission types, quests, and many more things in the game.
- The Market which is where you can buy various things for platinum or credits. These include weapons, cosmetics, boosters, and bundles.
- The Syndicates terminal which shows your standing with 6 different factions, all with differing relations with one another. See the Syndicates section for more information.
- Conclave which is where you can access standing and game modes relating to the PvP side of Warframe.
- Radio Scanner which displays broadcasts. This contains Nightwave broadcasts, a new reward system recently added in the game..
The Arsenal segment will be where you can customize the loadout of your Warframe. This where you can change weapons, frames, companions, and add items to your gear wheel for in-mission use. You can also add mods to your frames and weapons in this segment.
The Mods segment will be where you will access mods that you will acquire throughout your adventures.
- You can rank mods up to increase their effectiveness, but they will take up more mod capacity on frames/weapons the higher the rank is. Ranking mods up require Credits and Endo.
- You can sell mods for either Credits or Endo. Very useful if you have multiple duplicates of mods that you don’t need. I recommend that you sell unneeded mods for Endo as it is the harder resource to gather.
- This where you can transmute 4 unwanted mods into a single mod at the cost of credits. I don’t recommend this early on as it is luck based and costs a lot of credits. However, there is a slim possibility of getting important and rare mods through transmutation.
The Foundry segment is across from the mods segment. This is where you will craft most things in the game, including weapons and warframes.
- You need the blueprint for weapons/frames that you come across along with the raw materials displayed on the blueprint in order to build them.
The Arsenal, Mods, and Foundry are unlocked as you progress through “Vor’s Prize,” the quest which you will have to complete upon starting the game.
The Incubator segment is where you can breed companions. This is unlocked after completing the “Howl of the Kubrow” quest.
The Void Relic segment is located near the arsenal where you can access and refine void relics that you get from certain missions. This will be unlocked after
- You earn Prime parts of warframes/weapons by cracking void relics.
There are various rooms that you will not be able to access until you complete certain quests that unlock them.
- On one side of the orbiter behind the arsenal lies an infested room which you may only enter if you have a giant pink cyst on your warframe’s neck or if you equipped the Nidus warframe.
- The room in the middle is unlocked after completing “The Second Dream” quest.
- The room across the infested room to the right of the middle room will be unlocked after completing “The War Within” quest.
The Star Chart
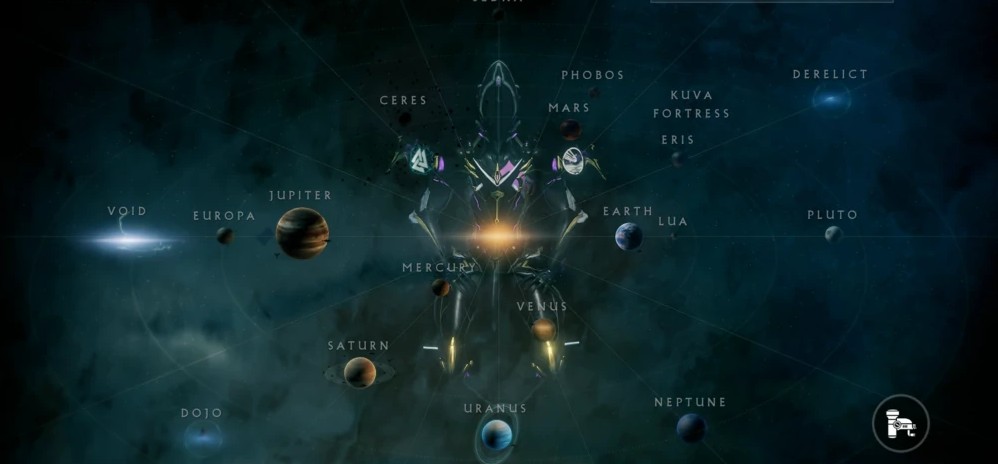
You might be asking yourself as to how do you unlock access to all of these planets. Well, this section will cover the basics of it as well as point out some tips in order to make the progression as easy as possible.
For starters, access to each planet is locked behind a Junction which has requirements that need to be fulfilled before entering.
- Entering a junction with all the requirements met will allow you to fight against a specter of certain warframes in which you must win in order to gain access to the planet. Completing junctions also gives Mastery points which will help you increase your Mastery Rank.
- Warframes with abilities that crowd control or protect them from damage trivializes these junctions. Excalibur’s second skill is able to open specters up for finishers to dispatch them easily. Volt’s third skill will protect him from the specters weapon fire.
Complete the missions accessible to you on Earth, working your way to the Venus junction. I recommend avoiding Cetus/Plains of Eidolon and Fortuna/Orb Vallis for the time being as they have rather difficult content for newer players.
Take your time and complete all the missions you can for the planets accessible to you. You may have to replay some missions over again in order to complete junction requirements, obtain warframe blueprints, and attain resources.
Most planets will have an Assassination mission where you will have to fight the boss of that planet. These bosses usually drop parts of warframes which you will need to craft them.
- It is recommended to fight these bosses multiple times until you get the 3 parts (Neuroptics, Chassis, and Systems) to build that warframe. The blueprint of the warframe itself can be purchased from the market for credits.
- In the case of Venus, I highly recommend doing the Assassination mission multiple times as it drops parts for Rhino, a warframe that makes the later planets/missions easy for newer players to get through.
Unlocking junctions and planets may also unlock other quests which you will have to complete in order to progress through the game. Some of the other junctions require completion of certain quests in order to advance.
Syndicates
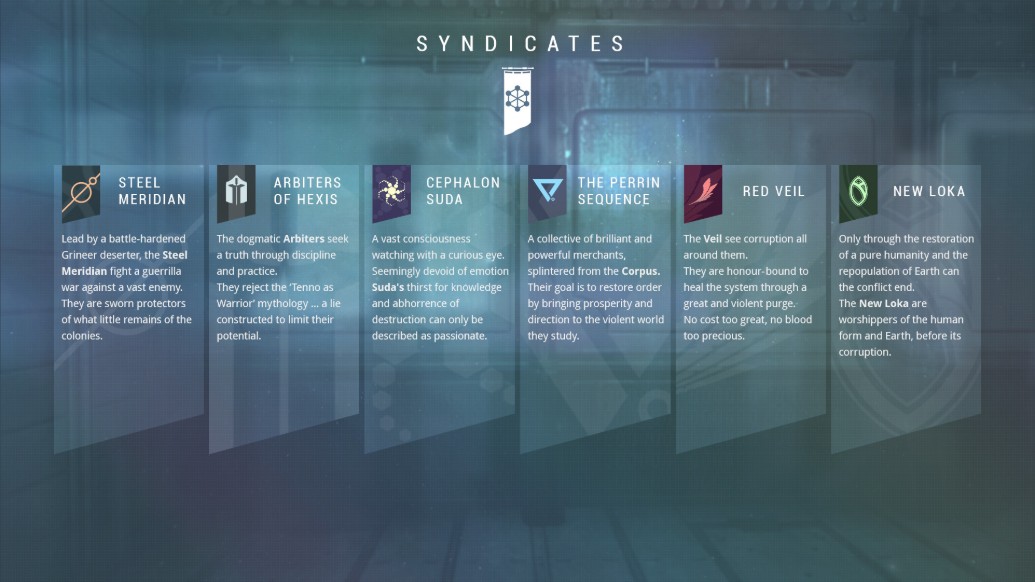
There are 6 different syndicates, all with varying relationships with one another. Gaining standing for 1 syndicate will make you hostile via negative standing with certain other syndicates. Also, syndicates will be allied with certain other syndicates. This means that standing gained for 1 syndicate will give half that to its allied syndicate.
- To avoid being in hostile standing with most syndicates, it is better to focus on 1 syndicate at a time. You can choose what syndicates you want to start with depending on preference.
- The 6 syndicates are Steel Meridian, Arbiters of Hexis, Cephalon Suda, The Perrin Sequence, Red Veil, and New Loka.
It is possible to be in positive standing with 4 syndicates at a time with careful balancing.
- Example: Gaining standing with Steel Meridian will also mean positive standing for its ally, Red Veil. Consequently, you will lose standing with Perrin Sequence and New Loka. Perrin Sequence will lose the exact amount of standing that was gained with Steel Meridian as they are enemies. New Loka will only lose half the amount that is gained with Steel Meridian as they are not as hostile towards each other as with Perrin Sequence.
- Likewise, you can gain standing with Cephalon Suda and Arbiters of Hexis as they don’t have any sort of relationship with Steel Meridian. However, gaining standing for these will negatively impact Red Veil standing.
In order to gain standing for syndicates, you will need a sigil for the syndicate that you must equip on your warframe. You can do this by going into your Arsenal -> Appearance -> Regalia -> Front or Back sigil.
You will be able to do missions for syndicates that give standing once you reach the first rank of that particular syndicate. These missions also have medallions that you can find throughout the map which you can turn in for additional standing.
You can purchase many things from syndicates. These include void relics, warframe specific mod augments, and special syndicate variants of certain weapons.
Mastery Rank
This is what defines how much of the game’s content you have experienced. You can kind of consider this as your overall level/prestige in the game much like how you would consider a character’s level in a game like World of Warcraft for example.
You can gain mastery points which will increase your overall Mastery Rank through:
- Completing junctions as these grant 1000 mastery points each.
- Leveling weapons/frames to rank 30 at least once.
- Completing all missions in the game at least once
Why would you want to increase your Mastery Rank you may ask? Well, a higher mastery rank comes with these benefits.
- More access to weapons and frames. Many of these require you to be a certain mastery rank in order to use it.
- More trades that you can do per day. Very useful if you want to earn platinum which you can then use to buy more weapon/frame slots.
- More starting base mod capacity for weapons/frames. This means you can add more mods to your weapon when it is unranked.
- More access to Riven Mods. Riven mods require a certain Mastery Rank in order to use, ranging from 8 to 16.
- More void trace capacity. This is useful for refining void relics so that they can yield rarer items upon cracking them in void fissure missions.
A higher daily amount of standing that you can earn per day with syndicates. There will be a mastery rank test that you will qualify for once you reached enough Mastery points.
- I highly recommend practicing the mastery rank tests first by going into Larunda Relay on Mercury and fast traveling to Cephalon Simaris’ room where you will find all of the mastery rank tests to the right.
- You can only attempt the mastery rank test once per 24 hours, hence why I recommend practicing beforehand to make sure you can pass the test.
- Don’t be discouraged if you can’t pass the test as any mastery points that you earn in the meantime will still transfer over to the next Mastery Rank.
- For quick, easy Mastery points early on, try and level all of the MK1 weapons as they can be purchased for Credits and come fully built. This eliminates the wait time and resources needed like with other weapons.
- Mastery Rank 15 is a good stopping point if you want to unlock every frame/weapon in the game, 16 if you are invested in Rivens.
Modding
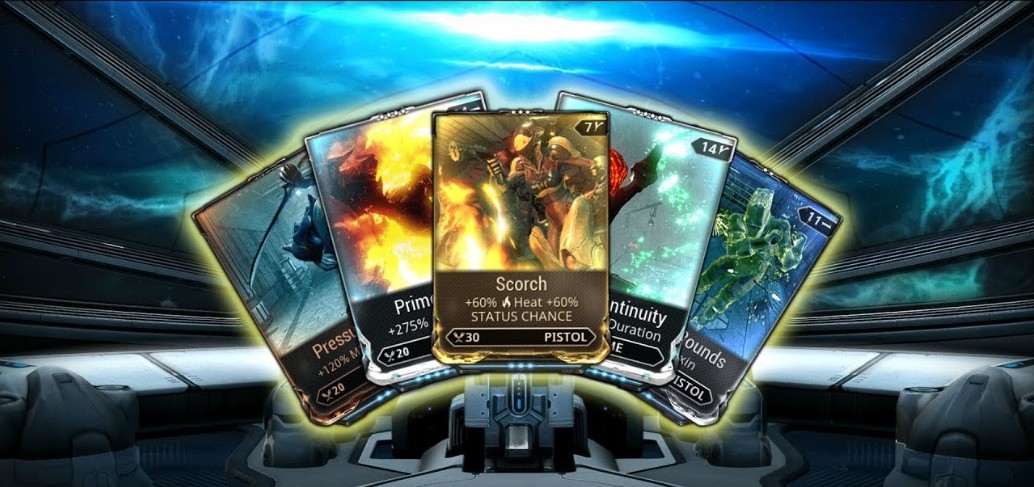
The mods that you put on your warframes and weapons are what makes or breaks its effectiveness.
For the early parts of the game, it is better not to max rank mods as they require a hefty amount of Endo and Credits. In addition, they also take up more mod capacity which will make it difficult to fit on most of your frames/weapons.
Any mods that have 10 ranks to it are the ones which cost the most Endo/Credits to max out. If you desire to get the most effectiveness out of them early on, then ranking them to rank 6 would be a good stopping point. If you have the mod capacity via Orokin catalyst/reactors, then rank 9 is also a good stopping point.
- Ranking a mod from rank 9 to rank 10 costs roughly the same amount of Endo/Credits as ranking it from 1 to 9. This is why I recommend leaving mods at rank 9 until you have enough resources and mod capacity to sustain it.
You will have flawed versions of the basic mods like Vitality early on when you start out. These will help you out early on as they don’t cost many resources to use. However, they become obsolete once you get normal or primed versions of them.
Mods also have polarities on them, which will reduce the capacity cost if they are put in a slot that matches. These polarities can be added on via Forma.
Primed versions of mods can be acquired by buying them off of Baro Ki’Teer who is a void trader that appears at a random relay every 2 weeks. These cost Ducats, which are acquired from selling primed parts from void relics.
- Primed mods generally have a higher max amount of ranks and cost more resources to max out.
There are corrupted mods that you can get from opening up Orokin Vaults in the Orokin Derelict. These mods will greatly increase one attribute while decreasing another. These are good examples of mods which you may want to keep multiple copies of as their negative bonus’ increase with rank.
Riven mods are weapon specific. You can attain these by completing Sorties which are high-level missions accessible after completing “The War Within” quest.
Damage
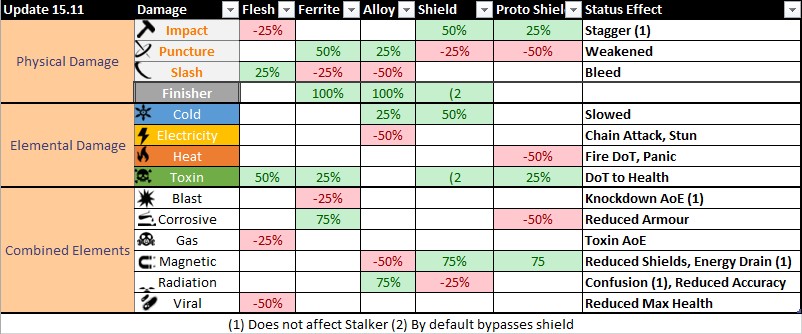
There are different damage types that weapons and certain warframe abilities can deal to enemies. These have bonuses and negatives depending on the type of armor and health type that the enemies have. A more comprehensive explanation can be found here.
There are 3 physical damage types that most weapons will come with: Slash, Impact, and Puncture. Generally, Slash is the most preferred as it has a chance to deal a damage over time effect that ignores armor/shields of enemies.
- If fighting against Grineer, consider using Corrosive damage, which combines the elemental mods of Electricity and Toxin. It can strip away their armor so that they are easier to kill. Viral may also be used, combining Cold and Toxin to reduce enemy health by half.
- Corpus enemies utilize shields to protect themselves. You may consider Magnetic damage, which combines Electricity and Cold. It has the chance to reduce max shields of enemies. Alternatively, you may use just Toxin damage as it will ignore their shields completely.
- Infested enemies tend to be the weakest. Slash, Heat, and Corrosive tend to perform the best versus them.
- Corrupted enemies tend to have the most variety of what enemies you will face, drawing from the 3 enemy factions above. The most threatening enemies of this faction tend to be Grineer and Infested based. As such, a combination of Corrosive, Slash, Heat, Cold, and Radiation will help against these enemies. Corpus-based enemies of this faction can be dispatched easily as well.
Mid-Game
So you’ve gotten the hang of the mechanics of the game and now you’re progressing from planet to planet. Now what?
You might have noticed by now that the enemies get tougher with every mission that you complete in each planet. If you’ve reached a point where you cannot complete a mission, then you reached the mid-game stage. This is usually when you unlock Jupiter or Saturn.
- This where weapons will perform very poorly if they have little to no mods or mods that aren’t upgraded enough.
- Enemies will be around level 20 and will start having better defenses, and reinforcements to give you a more difficult time.
In this stage, you should focus less on unlocking as much of the star chart as possible and more about mods to better empower your frames/weapons.
- This is where you need to consider what frames and weapons will perform the best with some investment to them.
- If you’ve been using Rhino to get through the difficult missions, then you may want to consider getting an Orokin Reactor to increase the amount of mod capacity for him. This will also allow you to upgrade your mods to better empower your abilities and survivability.
You should also focus on completing the quests accessible to you as they will reward you with items that are useful and possibly required in order to progress through the game.
- Some quests are optional, but I would recommend completing them regardless as they award certain items which may help you get past the missions which you may struggle with
- The list for the most important quests and how to complete them can be found here.
Depending on your Mastery Rank you may have access to certain weapons that can be powerful without too much investment. Some weapons that I recommend to get include:
- Tigris (Mastery Rank 7) - This is a duplex trigger shotgun that will do a lot of damage against enemies with the right setup, but will also be strong enough to tackle whatever gets in your way in the mid-game.
- Hek (Mastery Rank 4) - Another powerful shotgun early on, especially if you get the Scattered Justice augment for it. The augment will increase its multishot by 200 percent, which is a huge damage spike when paired with other mods.
- Lesion (Mastery Rank 7) - A Slash focused polearm that has an innate Toxin effect that can be combined with other elementals. This will decimate enemies even with a little bit of mod investment to it.
Leveling Weapons and Frames
Weapons and frames will have to be leveled a few times in order to fit the mods that make it perform to its potential, however leveling them during the mid-game can be tedious depending on how much of the star chart you’ve unlocked
- Helene on Saturn is a great place to level weapons/frames for those who don't have access to Sedna yet. This is a defense mission with a relatively small map. I recommend playing this with other players as the enemies killed by other players will award affinity to your frames/weapons needed to rank up.
- Hydron on Sedna will be better for leveling weapons/frames since it’s the same as Helene on Saturn, but with higher level enemies meaning more affinity. However, Sedna is one of the last planets unlocked and houses tough Grineer enemies which will overwhelm ill prepared players.
- Once you’ve gotten a few frames and weapons well modded you may progress through the star chart at your own pace. You should have at least a few weapons and frames that you can fall back on to get through the difficult missions.
Void Relics and Primes
Void relic missions are missions where you can crack relics that may award you with prime parts. You may do these whenever you want, but keep in mind that you may not be able to craft the prime parts as most of them require a high Mastery Rank. Prime Warframes and weapons are typically the best gear you can get as they have minor stat upgrades as opposed to their normal counterparts.
There are 4 tiers of Void Relics that you get from completing certain missions throughout the star chart:
- Lith aka Tier 1 - These are the most common and accessible.
- Meso aka Tier 2 - Second most common and accessible
- Neo aka Tier 3 - Less common than Lith and Meso, but somewhat accessible
- Axi aka Tier 4 - The least common of all and also the most difficult as these types of void relic missions are high leveled (around level 40-50.)
Most primed weapons/frames will have relics from most, if not all 4 tiers of Void Relic missions that you will have to complete in order to get all of the parts needed to build it. Axi relics/parts tend to be the most expensive as they are the least common to get.
Try and run void relic missions that are quick or can be repeated without extracting. Good examples are Capture, Interception, Defense, Excavation, and Exterminate.
- Let the enemies turn golden, indicating that they are corrupted. In this state, they can drop void traces which you need to crack the relic.
You may sell primed warframe/weapon parts for platinum. I only recommend selling spare parts of primed frames/weapons that you already built and ranked up to 30.
There are kiosks in most of the relays located throughout the star chart in which you can sell spare prime parts for Ducats which you will need to buy primed mods from Baro Ki’Teer aka the Void Trader.
- Keep in mind that the Void Trader only comes every other week and the items/mods he brings will be different.
- Mods that I recommend you get ASAP would be the primed versions of mods that give more damage to weapons such as Primed Pressure Point.
- Some primed mods that I recommend you DON'T get include primed ammo mutation because you won't be using them much in most builds.
- Don't get the primed mods that give damage against a certain faction (Example: Primed Expel Grineer/Corpus/Infested/Corrupted) right away. Prioritize these after you get the other mandatory/useful mods.
Becoming a Powerhouse Endgame
Warframe doesn’t have a traditional endgame like other games do. Endgame is more about collecting all the mods and weapons including their primed versions. This is so that you have the right tool for every type of content you’ll encounter.
You’ll reach the endgame once you’ve unlocked all of the planets and completed most of your quests. By now you should have unlocked most of the content that the game has to offer.
The most difficult missions that you will encounter daily once you’ve reached this stage would be Sorties and Kuva Floods which sport level 80-100 enemies.
Endgame Mods
You basically want to get the primed versions of all of the mods you use or are available from the Void Trader. These provide higher bonus’ than their normal versions, but also require more Credits/Endo to rank up.
- To farm credits to rank mods up, you can do the Index on Neptune as it awards large amounts of credits depending on how many rounds you do. I only recommend 2 rounds at most as the enemies will get tough really quickly, even with the best-modded frames/weapons.
- For farming endo, you’ll need to do the highest level Arena mission on Sedna called Vodyanoi. However, you will need frames such as Nekros and Hydroid to farm endo from fallen enemies as they will yield a higher chance to drop resources.
Rivens are also something you want to consider for endgame mods but not really necessary.
If you have access to the Orokin Derelict, you should consider doing Orokin Vault runs for a chance of acquiring Corrupted Mods. Missions in the Orokin Derelict will spawn a random room that can only be opened with a Dragon Key. There are 4 types of Dragon Keys:
- Bleeding Dragon Key which reduces the health of your warframe when equipped.
- Decaying Dragon Key which reduces the shields of your warframe when equipped.
- Extinguished Dragon Key which reduces the damage you deal when equipped.
- Hobbled Dragon Key which reduces the movement/sprint speed of your warframe when equipped.
I recommend doing these with a squad of 4 people as it will make searching for the room faster as well as splitting the penalties of equipping the Dragon Keys up to 1 per person.
There are 5 very important warframe mods that you’ll want to get from Orokin Vaults. They are:
- Narrow Minded which increases Ability Duration at the cost of Range
- Fleeting Expertise which increases Ability Efficiency at the cost of Duration
- Overextended which increases Ability Range at the cost of Strength
- Transient Fortitude which increases Ability Strength at the cost of Duration
- Blind Rage which increases Ability Strength at the cost of Efficiency
These warframe mods allow you to min-max your abilities and push it to their highest potential. These mods are required for specific builds for a specific purpose.
- For example, a Nova with Overextended is able to speed the enemies up with her Molecular Prime to make certain missions like Defense more quicker.
I recommend having 2-3 copies of each of these with varying ranks as the negative bonus’ will be higher per rank. Some frames abilities may benefit from one stat while others need to be balanced between all of them.
Sorties
These are the most difficult missions that you will encounter in Warframe daily. They range from a plethora of conditions and mission types. More info found here.
- Depending on the conditions and mission types, you will definitely need well modded-frames/weapons to tackle these missions.
- I would highly recommend doing these with other players unless you’re sure you have all of the gear/mods needed to complete it.
- It is broken down into 3 missions, all with increasing enemy level.
- Sorties will typically be just one faction that you’ll have to face. As such, you can mod your weapons with elementals that are most effective against them. Refer to the Damage section. Do keep in mind the conditions associated with the missions as it may render the damage type less effective.
Kuva Missions
If you’ve done the quests, you’ll probably get an idea and a bit of backstory behind Kuva and its origins.
Kuva is the resource that you’ll need to build certain warframes and roll Riven mods. You can do this in different ways.
- Kuva Siphon - Low to moderate level missions which you will need your Operator for to complete, you have to guard the Kuva machine and watch out for Kuva clouds
- Kuva Flood - Same as Kuva Siphon, only with level 80-100 enemies. They will reward double the amount of Kuva than Siphons. Only tackle these missions if you know you are ready to deal with the higher level enemies.
- Kuva Survival - Located in Kuva Fortress. It is known as Taveuni. It is a Survival mission with one twist where the life support capsule becomes a kuva harvesting point that you have to defend much like a console in Mobile Defense.
Which one is the best?
- Start with doing Kuva Siphons until you are comfortable. Only do Kuva Floods if you are properly prepared and equipped.
- Kuva Survival can award a lot of Kuva with a difficulty that you can decide on. Enemies will get stronger as time passes, but you are free to extract whenever you want after the 5 minute mark.
I highly recommend a Resource Booster if you plan on farming Kuva because you will earn double the amount of Kuva you receive.
The key to getting Riven mods with attributes to better increase the effectiveness of your weapons is to farm the Kuva. You can roll the Riven as many times as you want so long as you have the Kuva for it.
Bring a Smeeta Kavat with you for these missions as they have a chance to double the amount (quadruple with a Resource Booster) of Kuva you receive.
Endurance Runs
These missions are typically tackled by only the most elite players and are just missions that players can do for hours without stopping. They need very good coordination and setups between players. This is more as a means of bragging rights between seasoned veterans of the game.
These missions are typically missions which players can continue playing for as long as they want, from an hour to even as much as 8. Enemies will infinitely scale in level, damage, and toughness. This leads to enemies that range in the levels of 1000 to 3000 which are very challenging to take on.
- Those that want to tackle this challenge typically do Survival and Excavation.
- These will require very specific setups, and most other setups used in Sorties and lower level missions will fall off with endurance runs.
Arbitrations
These are missions that you can do once you’ve completed every single mission on every planet at least once. They have fairly high-level enemies and mission types are modified to make them more challenging.
There will be a bonus for specific warframes and weapons to encourage more gameplay diversity
- Despite the specific bonus’ you do not have to play as that specific frame nor use that weapon. Pick whatever you feel is right for the mission type.
- Pick warframes that you can survive with these missions. These missions do NOT let you revive, nor will it let you enter bleed out state where other players can revive you when you’re down. If you die once, then you're out for the entire mission.
Prioritize the drones in these missions because they render enemies near them invulnerable.
Rivens
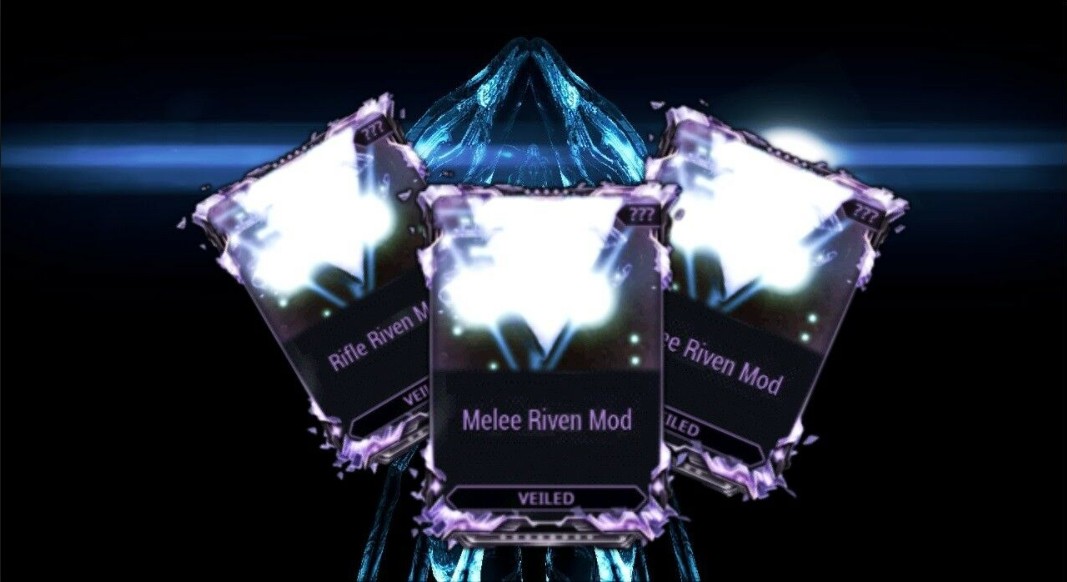
What are these weird purple mods that tell you to do something first you may ask? Read on to find out.
These are very special mods that you can put on specific weapons.
You will get your very first riven mod after completing, “The War Within” quest.
These require you to do a certain challenge in order to unlock them.
Like with weapons and frames, these mods do have a Mastery Rank requirement that is attached in order to use them. The highest they can go up to is Rank 16 with the lowest being Rank 8.
The weapon that the riven is unveiled for is completely random and tied to a certain class of weapons shown on the veiled riven
- Rifle riven mods unveiled will be a weapon based off of that weapons class. For example, you may unveil a Braton riven because it is a rifle.
Veiled riven mods can be put on any weapon of its class until it is unveiled. You can only put it on the weapon that the mod is tied to.
You can use Kuva to roll the attribute bonus’ of the riven until you get the desirable stats to better empower effectiveness of your weapon.
You can only have a certain amount of rivens in your inventory, at which you have either purchase more slots with platinum, dissolve additional riven mods, or be locked out of Sorties until you have the room for more.
I’d consider riven mods in Warframe as a form of gambling as it really tests your luck. These are really meant more for the later stages of the game as they can really push weapons to a whole new level of power depending on the bonus’.
Riven Challenge Tips
Unveiled rivens require that you do a challenge in order to unveil them. These are completely random and thus vary in difficulty. Here are some tips that may help with certain challenges.
- For rivens that require you to kill Dargyn pilots before they hit the ground, you will need to go into the Plains of Eidolon during the day time. There will be Dargyn pilots that will get on their Dargyn and start flying around shooting at you once alerted.
- This challenge is very easy with Ash as his first ability (Shuriken) will home in on them. Use this to take out their aircraft to make the pilot fall, and throw more shurikens as they are falling to kill them mid-air.
- For rivens requiring you to scan synthesis targets without using any abilities or traps, you will need to talk to Cephalon Simaris in a relay in order to activate the daily synthesis task. Locations of certain targets may be found here.
- As synthesis targets tend to move around a lot if they detect you, scanning them without using abilities or traps will be difficult. One way to bypass this would be an invisible frame like Ivara. Just make sure that you are invisible BEFORE you encounter the synthesis target.
- Another way to do this challenge is to simply get near the synthesis target and bullet jump away from them as they will be knocked down, leaving you a small window of opportunity to scan them with ease.
- Do be careful as Synthesis targets blend well with other groups of enemies. You can tell them apart if they have a blueish aura/outline/color scheme to them. They are also a bit tougher to kill than normal enemies that look like them.
For various other types of riven challenges, refer to this guide. Once again, riven challenges come in many different forms which would take me forever to cover in this guide. In addition, there are also many different ways to complete riven challenges.
Conclusion
I’ve covered what I can in this guide. Hopefully, this will help make your Warframe journey easier.
- One important tip is to make use of the Warframe wiki, which will give all of the information you may need to tackle whatever obstacle you encounter in the game.
- One last tip to help you get the hang of Warframe is to watch Youtubers who cover the game. My recommendations would be to check out Brozime, iFlynn, LifeOfRio, and AnnoyingKillah.
You May Also Be Interested In:
- Warframe: Best Warframes, Ranked Weakest To Strongest (Warframe Tier List)
- Top 10 Warframe Best Primary Weapons (And How to Get Them)


